week6-9 <<
Previous Next >> week15-18
week10-14
week10
.
建立Google API+專案
git clone https://github.com/mdecourse/cd2020pj1 到自己的隨身系統
登入gm帳號並開啟https://console.developers.google.com
選擇區域點選後建立專案
啟用API服務,選擇GOOGLE+ Domains API
點選憑證,點選設定同意畫面(設定為內部)
建立憑證(OAuth用戶端同意ID),點選網路應用程式
複製ID和密碼貼至SciTE並儲存
進入網路用戶端1設定URL與重新導向的URL
URL:https:// localhost:8443
重新導向的URL:https://localhost:8443/login/google/
利用leo開啟cd2020pj1.leo
點至@edit config.py更改名稱(和前面存檔的ID&密碼同名)
存檔,按下ROC
week11
week12
Vrep虛擬主機板
下載Ubuntu和VirtualBox
開啟VirtualBox,喜好設定新增網路
匯入Ubuntu
設定網路-僅限主機介面卡
密碼kmol2020
輸入xterm&,輸入ls以顯示資料
輸入cd coppeliasim4_rev4
輸入cd CoppeliaSim_Edu_V4_4_0_0_Ubuntu18_04
輸入ls,再輸入ls-l
輸入./cd coppeliaSim.sh開啟Vrep
開啟sdc.ttt檔
開啟car_model.py並執行
點選模擬
week13
IPV6伺服器連線設定
1.設定好網路連線下的host ip
(https://github.com/mdecourse/cd2020/blob/master/downloads/w13_ipv6_assignment.txt)
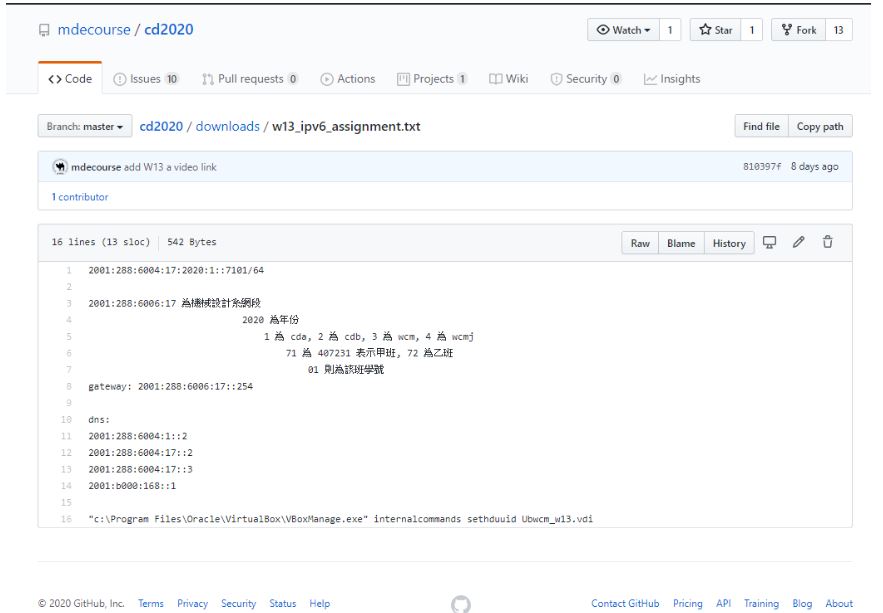
2.設定網路的ipv6位置設定
3.進入虛擬主機,指令輸入cd tmp>cd cd2020pj1>git pull >cd docs> cd cmsimde
4.輸入vi wsgi.py 更改host
5.設定好putty
6.按save open後,在putty頁面分別輸入兩次密碼kmol2020
7.開啟Xming,接著輸入xterm&
8.在開啟的視窗中輸入cd tmp>cd 2020pj1>cd docs>cd cmsimde>python3 wsgi.py
用google輸入網址https://[2001:288:6004:17:2020:7241]:17443 (必須要用自己的ip)
影片忘記錄了......拍謝
week14
小組會議(第5次)
1.講解ipv6連線設定及ttt檔更改的新路徑
2.虛擬主機及ubnutu bug解決方式
week6-9 <<
Previous Next >> week15-18